Showing posts with label Sweet Treats. Show all posts

Monday, 1 December 2014

The Jujup Experiment


Today is December 1st and in our house it's the day when we start playing X'mas carols. Sort of officially ringing in the X'mas season. So to usher in the festive spirit on the blog, here is my first post of X'mas. Two new flavour combinations for jujups...

Jujup making has been a part of our family's Christmas tradition for years now. My mom is an expert and last year, when we decided to spend Christmas in Gurgaon instead of going home to Baroda, I tried my hand at them for the first time. They turned out pretty well. Personally, I have never been a fan of these jelly sweets, but the hubby is and well it's a tradition... 

This year I decided to experiment with some new flavour combinations. Last year I made strawberry and peppermint, but I find these flavours to taste very synthetic in jujups, although I know that kids, and a lot of grown ups love them :) This time, I wanted to gourmet things up a bit. I tried orange & cinnamon and mulled wine. They came out pretty nicely even if I do say so myself :) Even I found myself popping a few of these jellies into my mouth when no one was looking... These jujups actually taste like Christmas :)


Jujups are not too difficult to make actually, they are just a little messy and you need a little patience. You can see the basic jujup recipe that I made last year, here. 


Orange & Cinnamon Jujups

Follow the basic jujup recipe and when it comes time to add the flavouring, add 1 tsp cinnamon powder that has been sieved, 3 tsps of orange extract or essence and 2 tsps vanilla extract or essence. and for the colouring, I added half a tsp of black food coloring. This will give the mixture an amber color.

Follow the instructions for cooling as mentioned in the basic recipe. When coating with castor sugar, add 2 tsp of sieved cinnamon powder to the castor sugar. 

Mulled Wine Jujups

For the gelatin mixture...
1/4 cup lemon juice
1/2 cup orange juice
1/4 water
50 g gelatin granules

For the sugar syrup
400 g sugar
1 cup dry red wine (use a really cheap one)
1 cup orange juice
1/4 cup water
1 tsp cinnamon powder (sieved) 
1/4 tsp clove powder (sieved) 
1/4 tsp cardamom powder
4 star anise 

For the sugar coating
Castor sugar
1 tsp cinnamon powder (sieved) 
1/4 tsp clove powder (sieved) 
1/4 tsp cardamom powder

Follow the instructions for making the gelatin mixture as in the basic recipe, except use the ingredients mentioned here.

For the sugar syrup mixture, add the sugar, wine, orange juice, star anise and water to a pot and heat on a low flame till the sugar dissolves. Once the sugar has dissolved, raise the heat and let it come to boil. Now add the spice powders and stir well. Strain this mixture and return to pot and reduce the heat to lowest flame. Carefully stir in the gelatin mixture and stir with whisk until the gelatin has dissolved completely. Raise the heat slightly and continue to stir. At this point you must keep watch on this mixture as it may start to boil over. 

Boil and continuously stir this mixture for about 30-45 minutes (this is the part that requires patience). Around the 30-40 minute mark you will notice that when you dip your spoon into the liquid and remove, a string of the syrup will form. If the string is still runny, continue to heat. Once the string starts forming and setting without immediately falling back into the pot, the mixture is ready. Pour into a greased tray as mentioned in the basic recipe and cool for a minimum of 12 hours. 

To cut and coat the jujups, once again follow the basic recipe, except instead of plain castor sugar, use ingredients mentioned in this recipe. Here are some pics to give you an idea of the coating process. Remember that you will need to keep the sugar coated jujups open in a plate for at least 12 hours so that they get a chance to dry a little more. Once this is done, pack in an airtight container. 


I use a brownie tin to set the jujups


Cut the set jelly into strips and coat with sugar like in the pic. 
The cut this sugar coated strip into squares and make sure 
to coat every surface with the sugar mixture. 


[All images by Shalini Pereira. Please do not use without prior written permission]


Friday, 20 June 2014

Lemon Panna Cotta


I was chatting with a friend recently and she mentioned that I haven’t been posting any recipes on the blog of late. And she’s right! I think the last recipe I posted was my hummus recipe and that was ages ago! Admittedly I’ve been a bit lazy in the kitchen lately, but temperatures hovering around 45 degrees Celsius sort of have that effect I guess :)

But the last few days I suddenly felt myself getting the urge to do some experimenting and I settled on Lemon Panna Cotta. In my opinion, nothing says summer more than lemons. Their yellow zest and tart, citrusy goodness scream Summer and the taste and smell of lemons are so refreshing when temperatures soar. And panna cotta is the perfect desert for summer. This simple dessert looks so very elegant, but requires minimum effort in the kitchen. What more could you ask for in a dessert?

Panna cotta means cooked cream and this dessert originated in Northern Italy. Panna cotta is a creamy, softly set dessert that should melt in your mouth. At its core a panna cotta is just cream and sugar set with just the right amount of gelatin that allows it to keep its form, while maintaining an irresistible wobble. And that is the most challenging part about making a panna cotta. There is nothing worse than a panna cotta that is rubbery because of too much gelatin.

What’s so awesome about a panna cotta you might ask? Well it’s so versatile!
  • It sounds fancy even though it’s pretty uncomplicated to make
  • It’s egg-less and gluten-free
  • It can be made using gelatin substitute like agar agar (china grass)
  • It’s a great dessert for vegans since the milk or cream can be substituted with almond milk or coconut milk

So I started with operation’ Lemon Panna cotta’. First attempt was a disaster... too little gelatin, attempt number two... too much, but I got lucky on the third try- perfect wobbly panna cottas with a lovely silky, creamy texture. Yay!

To serve a panna cotta you can either unmould it or serve it in what it was set. I set mine in a glass tumbler and a clear glass jar. The idea was to make a basic lemon panna cotta that could be served in a number of ways. Option one, was just the panna cotta garnished with a candied lemon peel. Option two was with a mango and mint salsa and it was so good- the perfect dessert for a summer lunch. And if you do want to put in a little extra effort, it would go really well with a dollop of lemon curd.


How to make lemon Panna Cotta

1/2 cup single cream
1/2 cup milk
1/4 cup hung curd
1 level tbsp sugar
Zest of 3 lemons (I used Indian lemons which are about an 1.5” in diameter)
1/2 tsp vanilla extract
2 1/2 tbsp honey
3 tbsp water
3/4 tbsp gelatin
Juice of 1 lemon

In a small bowl, mix water with lemon juice. Sprinkle the gelatin over this and leave for about 5 minutes, until the gelatin has absorbed the liquid and it looks a little like it’s forming.

In the meantime heat the milk, cream and sugar in a pan until the sugar has dissolved and the milk mixture is hot but not boiling. Do Not let it boil. Remove from heat and cool for about a minute. Add the lemon zest and the honey.

Next add the gelatin to the warm milk mixture and stir with a spoon or silicon spatula until the gelatin has dissolved completely. Don’t use a whisk as this will cause the mixture to foam, which is not desirable.

Let the mixture cool down, but not set. Mix the hung curd with a little of the milk-gelatin mixture to smooth and thin it out. Then mix this into the remaining mixture. Strain and pour into moulds or a glass. Cover with cling film and refrigerate for a minimum of four hours.  

If you are unmoulding, dip moulds in warm water and loosen edges slightly with a sharp knife. Turn over onto a plate and serve.

If you are serving it with the mango and mint salsa simply chop up some fresh mango and a few mint leaves and add a little lemon juice to this. The fresh fruit is lovely with the creamy texture of the panna cotta.


[All images- Shalini Pereira]

Please do not use images without prior written permission


Monday, 10 March 2014

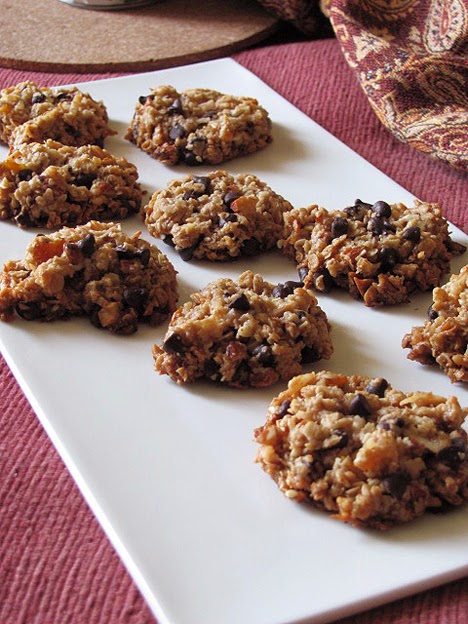
Quick & Simple Chocolate Chip Oat Cookies

Did you all have a great weekend? I did. Made it to the Windmill Design Festival on Saturday and picked up some nice stuff for the home. Will update you about my experience there soon. Caught up with friends after a really long time and discovered another awesome place to chill and have a few drinks (perfect Saturday date night with the hubby). See more about that here. 

I was going through the blog a few days ago and I realized I've not done a recipe post since probably before Christmas... actually I don't think I've actually done any baking since then, so it was a good thing that last Friday I had the most unbearable cookie craving. This usually happens when work is a little slow and my mind starts wandering to food. I also blame Pinterest :) I tried to ignore it, I tried to make myself busy... but it just wouldn't go away. My mind was saying cookies, cookies, cookies... and soon my stomach also joined in this chorus :) 

Do you sometimes have these unbearable cookie cravings? You know, the ones where you feel like you will absolutely lose it if you don't get a cookie fix? And then you open the pantry and to your utter despair... no cookies! This is exactly what happened on Friday. I thought I'd just eat a tiny cookie from the pantry and make the voices go away (sounding a bit crazy?) But when I saw zero cookies around I knew I was defeated and the voices in my head cheered!

Although I wanted cookies, I also wanted them quickly and I was in no mood to do anything too complicated. So I threw together a few things and whipped up a batch of chocolate chip oat cookies in, I kid you not, 30 minutes from start to finish.  The toughest thing about making these cookies is stopping yourself from eating them in the 20 minute cooling period. 


[All images- Shalini Pereira]


You know you have a problem when you make a batch of cookies telling yourself that you are making it for a loved one (in this case for the hubby), when in fact you know deep down you are making it for yourself :) But I was good this time and saved a few for him :)

Here's the recipe for these... 

Dry Ingredients
1/2 cup oats (I used Quaker oats)
1/4 cup chopped almonds
1/4 dried coconut shreds (unsweetened)
2 tbsp small chocolate chips
1 tbsp sesame seeds
1 tbsp dried ripe mango (cut into tiny bits)


Wet Ingredients
2 tbsp butter
1 tbsp olive oil
1/4 cup brown sugar
2 tbsp maple syrup
1/4 tsp almond essence
1 tsp vanilla essence
1 tsp cinnamon
pinch salt

Preheat oven to 160 degrees Celsius. Mix all the dry ingredients together in a bowl. In a pan, melt the butter with the brown sugar. Once the butter is melted and sugar is dissolved, remove from flame and add the olive oil, maple syrup, essence, cinnamon, salt. Combine the dry and wet ingredients. 

Line a cookie sheet with butter paper or a silicon sheet. Take heaped teaspoons of the mixture and place on the sheet, keeping a space of about an 1 1/2" between each heap. Flatten each heap with your hand. Don't worry if the mixture is a little loose. It will come together on cooling after baking.

Bake in oven for 20 minutes or until they are golden. Remove and allow to cool completely. Transfer to an airtight jar.

Love these cookies because they are delicious and ridiculously easy to make. And since they have no flour, they are slightly better than regular cookies. Next time I'm going to also add a 1/4 cup salted peanuts to the mix. Think they'll be quite tasty too. Will keep you updated.

On a totally different note, the All Things Nice FB page is in serious need of some love... so please, pretty please show it some love. The link is here. I'm thanking you all in advance for all the love & likes :) have a great day and a Fabulous week guys!


Wednesday, 4 December 2013

'Tis The Season....Christmas Inspired Jujups

OK, so firstly I have to apologize for being a bit irregular in my posts. The last few weeks have been hectic and stressful for a number of reasons. But December is here now... And that means gearing up for Christmas! 

Christmas for me means many things- friends & family, sharing & giving, fun, laughter, joy and delicious goodies! For me, a really important part of Christmas are the traditional (and yummy) sweets that the family makes. Sweet making is a huge family tradition, with some of the recipes being passed down over several generations. And they all taste so good! 

Now I have to admit that usually sweet making for me has always involved watching my mum making the sweets and then eating a lot of them! That's because Christmas is always with my folks, back in Baroda. This year however we are here (in Gurgaon) for Christmas, so it will be me doing all the sweet making, much to the amusement of my mum! 

I started the sweet making process a little early this year, just in case my first attempts at sweet making were a disaster! (at least there would be time for me to have another go) So the first thing I made is something we call Jujups, a sugar coated jelly candy that's a little softer than jelly beans, and a lot bigger in size. Now if I were to be really honest, I am not a big fan. But it is a family favorite- my mum loves it and so does the hubby and its part of Christmas tradition.


Aren't they pretty?


All green & red & Christmassy!


A kid's delight...


And something that makes a lot of grown ups act like 
gleeful little kids :)


This is my mum's recipe, one she has been using for years. And now it's mine too! A recipe that is part of Christmas tradition, and one that I hope to hand down to my kids one day. That's another thing about X'mas- tradition and that sense of connection you get from being part of a tradition. Its a really special feeling.

Warning- Attempt this recipe only if you really love to cook and are a little bit crazy! Although the recipe is pretty straight forward, and doesn't need a lot of fancy ingredients, it's quite a pain to make. It involves a lot of standing around and stirring till you achieve just the right consistency, and then the process of cutting and sugar coating is very messy! But the end result was pretty wonderful- jujups my mum would be proud of! 

My mum's Jujup recipe
500g sugar
50g gelatin
1/2 cup fresh lemon juice
1/2 cup + 2 cups water
food coloring
preferred flavorings 
butter for greasing
lots of castor sugar
a brownie tray or a thali

I made two batches- peppermint & strawberry

Instructions
Grease a brownie tray or a thali with butter.

In a bowl, mix the lemon juice with 1/2 up of water and sprinkle the gelatin over this. Mix it together and set aside for 45 minutes. 

After 45 minutes dissolve sugar with 2 cups of water in a large saucepan over low heat. Once the sugar dissolves, raise heat and bring to boil. Boil for about a minute and then once again lower the heat. By now the gelatin mixture will be quite firm and solid. Carefully add this to the sugar syrup and stir until all the gelatin has dissolved. Raise the heat and boil for 30 minutes. You will need to carefully watch the the mixture as it boils. Stir it regularly so that it doesn't overflow. After 30 minutes you will notice that a thickish string will start to form when a spoon dipped into the syrup is raised. Some of it will still cling onto the spoon. If it doesn't keep boiling till this happens. 

Once the string forms, add the flavoring and the color. You will need to do this by taste since the strength of flavorings vary. Be careful when you taste, the syrup is VERY hot. So to taste, drop some syrup onto a cool plate and allow to cool slightly before tasting. 

Once color and flavor is added, boil for about 15 mins. Pour into the greased tray (the jelly mixture should be at least 12mm deep) and cool for at least 24 hours. I cooled mine for 26 hours under a low speed ceiling fan. 

Once the jelly is set (after 24 hours), run a very sharp knife around the edges of the tray. Keep a large plate of  castor sugar ready. My mum managed to un-mold the entire jelly unto the castor sugar. I was nervous about doing this so I cut out about 20-25mm strips then proceeded to coat them in castor sugar. Then you need to cut each strip into cubes of about 25mm x 25mm and coat the sticky edges with more castor sugar. 

Once you have done this to the entire solidified jelly strips, leave in the castor sugar overnight. They will firm up some more. Then pack them in an airtight container lined with parchment paper and they should be fine till Christmas. 

psst! A little word of advice, hide the box somewhere safe, especially if you have little elves that may slyly eat them when no one's looking, or they may be gone before X'mas!

What X'mas goodies are you making? Would love to know!


[All images- Shalini Pereira]

Tuesday, 12 November 2013

Ridiculously Easy Chocolate Cupcakes with Chocolate Frosting

I have recently discovered a love for cupcakes. OK, that's not quite right, I've always loved cupcakes, but I've recently discovered how much I love making them! They are just so darn pretty! There's a strange sort of calming pleasure I get when I make them, and especially frost them! I know it sounds a bit crazy, but there it is... And the best part is that they are so easy to make! You can whip up a batch in about an hour from start to finish, & then top them with whatever frosting you want. And although they are so easy to make, they can really wow your guests because if you take a little care they can look really sophisticated.

It's because of this that I've been experimenting with cupcake recipes in the attempt of finding go-to recipes that are simple, uncomplicated and made from ingredients that aren't too difficult to find. I found a really nice vanilla cupcake recipe the other day on Live Love Pasta and I tried it over Diwali when we had a few friends over for dessert. Filled them with homemade lemon curd and topped them with vanilla butter cream frosting. They were a hit with the friends.

After that success I thought I really needed an easy recipe for everyone's favorite- Chocolate cupcakes. And after a few unsuccessful attempts, I came up with one that is easy, quick and most importantly, YUMMY!


Aren't they pretty? I topped them with chocolate sprinkles

In fact the batter itself was so good that I had to resist the urge to eat it straight out of the bowl (wasn't too successful, ended up eating a few spoonfuls).  


The cupcake itself was light, fluffy, moist and had a great chocolate flavor. 


The icing, which was a bit of an experiment using some left over butter cream icing, was light, silky smooth, velvety and delicious. Trust me, it was so good, I literally licked the  bowl clean :) What I loved about it was that it's not clawing and sweet, and even though its rich, it still tastes light. It's also not too heavy on the chocolate, so kids will love it too! 

I will try the frosting again from scratch and update this post so that you can make it from scratch if you don't have some butter cream frosting in the fridge.


So now that I have my chocolate & vanilla go-to cupcake recipe, I'm looking forward to some interesting experiments with frosting combinations... will keep you updated :)


Chocolate Cupcakes  (makes 12 with a bit leftover which you can eat out of the bowl)

1/4 cup un-sweetened cocoa 
1/2 cup water
3/4 cup flour
1 tsp baking powder
pinch salt
1/2 cup sugar
60g cup butter
1 egg
1 tsp vanilla extract
1 tbsp honey

Frosting
1/3 cup + 1 tbsp cream
1/2 cup dark chocolate (chopped up into bits- smaller the better)
1/3 cup of some old left over vanilla butter cream frosting (softened)

Preheat oven to 200 degrees Celsius.
Boil the water and stir in the cocoa until a smooth mixture forms. Allow to cool. Sift flour, salt and baking powder together. In a large bowl, cream together butter and sugar till light and fluffy. Add the egg and beat for about 2 minutes. Whisk in the vanilla and honey, and alternately add the flour and cocoa mixture, starting and ending with the flour.

Pour into a lined muffin tin, about 3/4 way up and bake for about 20 minutes. Check them after about 15 minutes and keep an eye on them so that they don't dry out or burn. NOTHING worse than DRY cupcakes! They are ready when a toothpick inserted in the middle comes out clean. 

For the frosting, heat 1/3 cup cream in a pan till it just comes to boil. Remove from heat and add the chocolate. Stir constantly till the chocolate melts and you get a completely smooth mixture. Place in refrigerator till just cool. In a bowl, whisk the butter cream frosting till it is creamy and soft. Add the tablespoon of cream and continue to whisk. slowly add the chocolate mixture, all the while continuing to whisk. Fill mixture in a piping back and pipe onto cooled cupcakes. 


[All images- Shalini Pereira]


Thursday, 3 October 2013

Poppy Seed, Almond & Lemon Rolls

I've been doing a lot of baking lately, especially breads. Think the cooler weather is making me crave those carbs!  Its awful, because I'm trying to watch what I eat. But then again, life is too short to live without sweet treats.

I recently posted about my experiments with apple cinnamon rolls and I was so happy with the way the bread turned out, that I decided to use the same bread recipe for another roll- Poppy Seed, Almond & Lemon Cinnamon Rolls. Lemon & poppy seeds is such a classic combination, especially in cakes. In fact Donna Hay's Lemon Yogurt Cake is a huge hit at home and I make it quite often, but I add poppy seeds to this. And its yum!


So it was from this fascination with this classic flavor combination that I decided to try out this recipe. They turned out pretty darn good. I made quite a big batch and they were gone in less than two days! In fact they only lasted that long because I rationed them out!


The Recipe

For the bread follow the same recipe I used for the Apple Cinnamon Rolls- you can see the recipe here. 

For the poppy seed filling you will need the following...

1 1/3 cup poppy seeds
1/3 cup almonds
1/2 cup butter
3/4 cup sugar 
3 tbsp lemon juice
2 tsp lemon zest

Blitz all the ingredients in a processor until it forms a course, spreadable paste. If the paste is too stiff, add a little more lemon juice. Then follow exactly the same process of rolling out the risen bread dough as in the Apple Cinnamon Rolls, replacing the apple filling with the poppy seed filling. Like this


[All Images- Shalini Pereira]

Wednesday, 25 September 2013

Delicious Apple Cinnamon Rolls

To borrow a phrase from GOT, "Winter is coming", and around this time of the year I start getting cravings for things like apple pie, apple crumble, apple cakes... you see the pattern here right? Basically anything with apples. My need for all things apple got me thinking. What if I could combine two of my favorite things, apples and bread, to make apple cinnamon rolls!

I know I've said this before, on numerous occasions, but I'll say it again. There is nothing quite like the aroma of baking apples and cinnamon wafting through the house. And if you factor in the aroma of baking bread... its my idea of heaven. You cook with your nose as much as with your eyes. The sense of smell is so important and its probably one of the reasons I love to cook. The pure pleasure you get from having the mouth watering smell of good food filling your nostrils. That, and the joy you feel when things you make are polished up.

These rolls are a great breakfast treat. Make them a day ahead, and then enjoy them the following morning. I'm embarrassed to admit that I have often gone to bed looking forward to, and dreaming about enjoying these rolls for breakfast the next morning. What could be better than waking up, banging a roll in the micro for a couple of seconds and enjoying it with a nice, steaming cup of coffee. They are also great for a teatime snack, especially if you have friends visiting. They are a great way to get oohs and ahhs from them. 

Anyway Sunday was the day I ear marked for the experiment of my apple cinnamon rolls. All of us were at home so we could all enjoy some hot, yummy bread fresh out of the oven. (I kept my fingers crossed that the experiment would work, else I'd have a very grumpy hubby and UJ to deal with). The main experiment was with the bread recipe. A while back I had posted a recipe for cinnamon rolls which I had tried out. These were nice and rich, but I wasn't totally satisfied with the bread. It wasn't light and fluffy. I basically wanted a rich, slightly sweet bread that was also light and fluffy. A little tweaking was in order and I decided to try out some things of my own.  Isn't that the best part of cooking? Trying new things and experimenting? Sometimes meeting with success and at others, dealing with total disasters. 

Like the time I first attempted to make a pizza base at home. I followed Jamie Oliver's recipe which said pile the flour on the counter top, make a well in the center of the flour and pour your liquid in. Well I did exactly that, but for some reason the liquid yeast mixture decided to over flow and spill all over my counter, down the sides of my cabinets and all over the floor. What a DISASTER! and a total MESS for me to clean up! After a lot of cursing and ranting I did learn a valuable lesson. I'm no Jamie Oliver :-) And since that day, I've always done all preliminary mixing in a nice big bowl. No spills!

Luckily, this experiment was a success. The rolls turned out pretty darn good, even if I say so my self. They were rich, soft, a little sweet and still fluffy. And they disappeared pretty quickly. They are fine to keep overnight, but I would suggest storing them in the fridge if its for any longer (if they last that long!). 


The Bread

7 cups plain flour
3 tsp dried yeast
2 cups milk
1/2 cup sugar minus 1 tbsp
1 tbsp honey
1 tbsp butter
2 tbsp olive oil
1 tsp vanilla extract/essence
1 egg, lightly beaten
2 tsp baking powder

The Filling

8 apples, peeled and chopped finely
2 tbsp dark brown sugar
2 tbsp sugar
2 tsp cinnamon powder
1 tsp clove powder
2 tbsp butter
Extra softened butter
Extra dark brown sugar
Extra cinnamon powder
salt

In a large pan heat the milk with the sugar until the milk is just warm. To this add the butter, honey, olive oil and mix until the butter melts. When the mixture has cooled and is lukewarm, add the yeast and stir gently. Leave for about 15 minutes until the mixture appears frothy.

While the yeast is working its magic, sieve the flour.

Once the yeast has become all frothy, add the egg, vanilla, and baking powder and mix well, but do not whisk. Add the flour (I suggest you first add only six cups of flour and slowly add more if the mixture is too sticky to knead) to this and mix with a wooden spoon until a dough starts to form. Tip this out onto a lightly floured surface and knead for about 10 to 15 minutes, until the dough is smooth and elastic. Place the dough in a bowl that has been lightly greased, cover with a wet towel and leave it alone for about 2 hours, till it doubles.

While the dough is rising, place the chopped apples in a pan with the sugars, cinnamon, clove and 1 tbsp butter, cover and heat on a low flame until the apples have softened and browned. Remove the lid and heat until any liquid drys out. The mixture has to have absolutely no liquid. Let it cool. 

Once the dough had risen, tip it out onto the platform and divide into four parts. Roll each part into balls. Roll each individual ball out. Spread some softened butter onto the rolled out dough.


Like this.


Preheat oven to 180 degrees Celsius. 

Evenly spread out your apple mixture and then sprinkle with cinnamon powder, dark brown sugar and sugar. 


It should look something like this.


Start rolling the dough like in this


Cut the roll like this


Place in a greased pan like this.


Cover with a wet towel and let it rise for about 20 minutes to half an hour. The rolls will puff up. Bake in the oven until golden brown. Remove from the oven and brush top of rolls with butter and allow to cool. 

Repeat same process with other rolls. 

Hope you enjoy!


[All Images- Shalini Pereira]


Monday, 10 June 2013

In Search of the Perfect Brownie....

Before you read this post, I should warn you that its quite a long one, and I apologize in advance, but I guess this is a topic that I'm really passionate about. Chocolate brownies!

I love chocolate. In any form. It always amazes me how a tiny square of this dark brown, bittersweet deliciousness can instantly make the world a happier place! And when in comes in the shape of a gooey, fudgy brownie, well, you really can't ask for too much more, can you? However, I have to say that I am one of those people who DO NOT like cakey brownies. Nothing irritates me more than ordering a brownie at a restaurant or cafe and getting a piece of 'chocolate walnut cake' cut into a square! 

So now that you all know on which side of the fence I rest when it comes to the cakey versus the fudgy brownie, let me share with you my little brownie saga. Lately I've been trying out quite a few brownie recipes, but not really finding one that ticks off all the boxes on my checklist.

1. Crispy, wafer-like top
2. Gooey, rich center
3. Easy to make. There are a lot of recipes that call for a ridiculous number of eggs, or the use of melted chocolate, which let's admit, is a bit of a pain. Because in brownies, I think cocoa works just as well, and I can't be bothered to chop up bits of chocolate and melt it each time I want to whip up a batch of brownies.

Anyway, this Saturday was a nice slow day and when an old school chum who is working on a project in Mathura (a town a few hours away) told us he was dropping in for the weekend, I decided to use him as a guinea pig. He has a real sweet tooth and has been asking me to make him a batch of brownies for a while now. Perfect opportunity to do some more trials!

I have finally managed to work out a recipe which is inspired by the one on the Epicurious website. However I did make a few changes to this recipe. I used salted butter instead of unsalted, because I thing the extra salt worked quite well. I also added a little milk, because I found the melting of the butter with the cocoa and sugar a bit difficult without it. I also replaced the walnuts with roasted almonds because I didn't have walnuts at home. That was a mistake. I really wasn't too happy with how this worked out.

On the whole, I was quite happy with the overall taste, but I was still a little disappointed with the the top crust that is such an integral part of any good brownie. However after a little research  on how to achieve that perfect crust, I discovered that the crispy top of a brownie is actually a layer of meringue! It forms by beating the mixture very well after the eggs are added, but before adding the flour. I'll definitely remember this the next time I make brownies! Another change I'll make is to use powdered sugar instead of granulated sugar. Hopefully this will improve the look of the crust that forms.

All the obsessive experimenting aside, I love it when the things you make disappear quite quickly. And these brownies did. I guess that's another one of my 'Monica' traits. 

So, if you're like me, and you love brownies the way I do, all gooey and rich, then here's the recipe....


3/4 cup butter

2 tbsp milk

1 1/4 cups powdered sugar

3/4 cup plus 2 tablespoons unsweetened cocoa powder 
1/4 tsp salt
1 tsp vanilla extract
3 cold eggs
1/2 cup all-purpose flour

2/3 cup walnuts

And here's what you do...

Add the butter, sugar, cocoa and milk to a microwave proof bowl and heat it on high a minute at a time, till the mixture is smooth and runny. Allow to cool.

When the mixture is only slightly warm, add the eggs, one at a time, while continuously beating with an electric beater. Beat vigorously for about a minute or two.

Pour into a greased and lined brownie tray and bake in a preheated oven at 160 degrees Celsius for about 25-30 minutes. To check, insert a toothpick into the center of the brownie. It should come out with a few crumbs still sticking to it.

Here is the result...


[Image- Shalini Pereira]


I am going to try this recipe out again this weekend. This time I will use powdered sugar, and also follow the tip about beating the eggs. Will update you with the results...


You might also like

Related Posts Plugin for WordPress, Blogger...